
Mastering JavaScript Events: Building Interactive, Data-Driven Interfaces
In the rapidly evolving landscape of web development, the difference between a static document and a dynamic application lies almost entirely in how interaction is handled. At the heart of this interaction is the concept of JavaScript Events. Whether you are clicking a “Like” button on a social media feed, scrolling through an infinite list of videos, or submitting a form asynchronously, events are the mechanism that bridges the gap between user intent and application logic. For developers embarking on a Frontend Journey or mastering Full Stack JavaScript, understanding the nuances of the JavaScript DOM and event propagation is non-negotiable.
Modern web applications, such as Instagram or TikTok, rely heavily on a seamless integration of structured data, dynamic rendering, and precise event handling. It is no longer enough to simply write HTML and style it with CSS. Today, we build data-driven interfaces where JavaScript Objects and JavaScript Arrays dictate the structure of the UI, and event listeners breathe life into them. This article serves as a comprehensive JavaScript Tutorial, taking you from the basics of addEventListener to advanced concepts like Event Delegation and asynchronous state management, ensuring you write Clean Code JavaScript that scales.
The Core of Interaction: DOM and Event Listeners
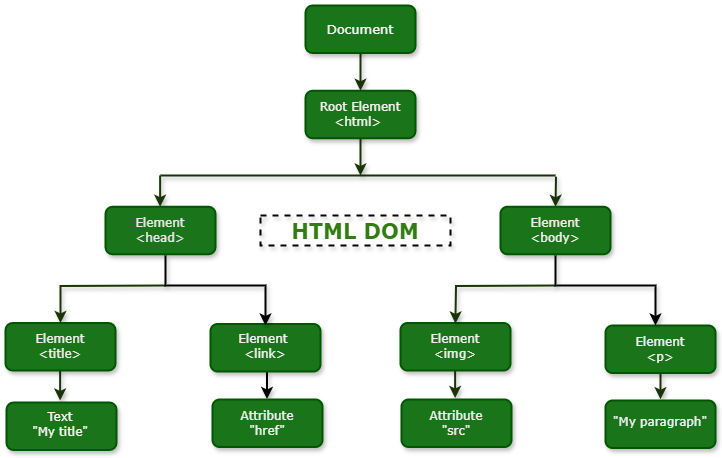
Before diving into complex architectures, we must establish a strong foundation with the Document Object Model (DOM). The DOM is a tree-like representation of your web page. JavaScript Events are signals fired by the browser when something interesting happens—this could be a user action (clicks, keystrokes) or a browser action (load, resize). To react to these signals, we use JavaScript Functions known as event handlers.
The Standard Approach: addEventListener
In the days of legacy web development, inline events (like onclick="...") were common. However, Modern JavaScript (ES6 and beyond) dictates a separation of concerns. The gold standard is addEventListener. This method allows you to attach multiple listeners to a single element and provides fine-grained control over how the event is captured.
Let’s look at a practical example. Imagine a simple “Follow” button component. We need to toggle the state of the button and update the UI immediately. We will utilize Arrow Functions for a concise syntax.
// Select the button element
const followBtn = document.querySelector('#follow-btn');

// State tracking (simulating a component state)
let isFollowed = false;

// The Event Handler Function
const toggleFollow = (event) => {
    // Access the element that triggered the event
    const button = event.target;

    // Toggle State
    isFollowed = !isFollowed;

    // Update UI based on state
    if (isFollowed) {
        button.textContent = 'Following';
        button.classList.add('active');
        button.style.backgroundColor = '#e1e1e1';
        button.style.color = '#333';
    } else {
        button.textContent = 'Follow';
        button.classList.remove('active');
        button.style.backgroundColor = '#0095f6';
        button.style.color = '#fff';
    }

    console.log(`User interaction: ${event.type} on ${button.tagName}`);
};

// Attach the listener
if(followBtn) {
    followBtn.addEventListener('click', toggleFollow);
}
In this snippet, the event object (often abbreviated as e) is crucial. It contains metadata about the interaction, such as coordinates, the target element, and timestamps. Understanding this object is the first step toward mastering JavaScript Basics.

Data-Driven UI: Combining Arrays, Objects, and Events
Real-world applications rarely consist of hard-coded HTML buttons. Instead, content is fetched from a REST API JavaScript endpoint or a GraphQL JavaScript query and rendered dynamically. This requires a shift in thinking: the data serves as the “single source of truth,” and the DOM is merely a reflection of that data.
Apple AirTag on keychain – Protective Case For Apple Airtag Air Tag Carbon Fiber Silicone …
Structuring Data for Interaction
To build a component like a video feed or a list of posts, we start with an array of objects. Each object contains the properties necessary to render the UI (username, video URL, caption) and properties to track state (isLiked, isMuted). This is a fundamental concept used in every React Tutorial or Vue.js Tutorial, but understanding how to do it in vanilla JavaScript is vital for grasping the underlying mechanics.
Here is how we can structure a data set and dynamically render it using JavaScript Loops (specifically forEach) and Template Literals.
// 1. The Data Structure (Array of Objects)
const reelsData = [
    {
        id: 1,
        username: 'tech_guru',
        caption: 'Learning JavaScript Events 🚀',
        videoUrl: 'assets/video1.mp4',
        likes: 120,
        isLiked: false,
        isMuted: true
    },
    {
        id: 2,
        username: 'frontend_wizard',
        caption: 'DOM Manipulation Magic ✨',
        videoUrl: 'assets/video2.mp4',
        likes: 450,
        isLiked: true,
        isMuted: true
    }
];

// 2. The Rendering Logic
const feedContainer = document.querySelector('.reels-feed');

const renderFeed = () => {
    // Clear existing content to prevent duplicates
    feedContainer.innerHTML = '';

    reelsData.forEach((reel) => {
        // Create the HTML string using Template Literals
        const reelHTML = `
            <div class="reel-card" data-id="${reel.id}">
                <div class="video-container">
                    <div class="placeholder-video">Video: ${reel.videoUrl}</div>
                    <button class="mute-btn">${reel.isMuted ? '🔇' : '🔊'}</button>
                </div>
                <div class="reel-info">
                    <h3>@${reel.username}</h3>
                    <p>${reel.caption}</p>
                    <div class="actions">
                        <button class="like-btn ${reel.isLiked ? 'liked' : ''}">
                            ${reel.isLiked ? '❤️' : '🤍'} ${reel.likes}
                        </button>
                    </div>
                </div>
            </div>
        `;

        // Inject into DOM (Caution: Ensure data is sanitized to prevent XSS)
        feedContainer.insertAdjacentHTML('beforeend', reelHTML);
    });
};

// Initial Render
renderFeed();
By using data-id attributes in our HTML, we create a link between the DOM element and the specific object in our reelsData array. This is essential for the next step: making these dynamically generated elements interactive.
Advanced Techniques: Event Delegation and Async State
A common pitfall for beginners is adding an event listener to every single button inside a loop. If you have 100 posts, that is 100 listeners. This hurts JavaScript Performance and causes memory leaks. Furthermore, if you load more posts via infinite scroll, the new elements won’t have listeners attached.
Event Delegation
The solution is Event Delegation. This technique leverages “Event Bubbling”—the concept that an event triggers on the target element and then bubbles up through its parents. We attach a single listener to the parent container (.reels-feed) and check which child was clicked.
Integrating Async/Await and API Simulation
In a real application, clicking “Like” should not only update the UI but also send a request to a server. We will use Async Await and Promises JavaScript to simulate a network request. This demonstrates how to handle JavaScript Async flows within an event handler.
// Mock API function to simulate backend communication
const updateLikeStatusAPI = async (reelId, newStatus) => {
    return new Promise((resolve) => {
        setTimeout(() => {
            console.log(`[API] Updated Reel ${reelId} like status to: ${newStatus}`);
            resolve({ success: true });
        }, 500); // Simulate 500ms network latency
    });
};

// Event Delegation Handler
feedContainer.addEventListener('click', async (e) => {
    // 1. Identify the target
    const target = e.target;

    // 2. Handle "Like" Button Click
    // We use .closest() to handle clicks on the icon inside the button
    const likeBtn = target.closest('.like-btn');

    if (likeBtn) {
        // Find the parent card to get the ID
        const card = likeBtn.closest('.reel-card');
        const id = parseInt(card.dataset.id);

        // Find the data object
        const reelIndex = reelsData.findIndex(r => r.id === id);
        if (reelIndex === -1) return;

        // Optimistic UI Update: Update UI immediately before API responds
        const currentReel = reelsData[reelIndex];
        const newLikedState = !currentReel.isLiked;

        // Update Local State
        currentReel.isLiked = newLikedState;
        currentReel.likes += newLikedState ? 1 : -1;

        // Re-render specifically or manipulate DOM directly for performance
        // Here we manipulate DOM directly to avoid full re-render
        likeBtn.innerHTML = `${newLikedState ? '❤️' : '🤍'} ${currentReel.likes}`;
        likeBtn.classList.toggle('liked');

        try {
            // Perform Async Operation
            await updateLikeStatusAPI(id, newLikedState);
        } catch (error) {
            console.error("API Error:", error);
            // Revert UI if API fails (Error Handling)
            currentReel.isLiked = !newLikedState;
            currentReel.likes += newLikedState ? -1 : 1;
            likeBtn.innerHTML = `${!newLikedState ? '❤️' : '🤍'} ${currentReel.likes}`;
            alert("Failed to like post. Please check your connection.");
        }
    }

    // 3. Handle "Mute" Button Click
    const muteBtn = target.closest('.mute-btn');
    if (muteBtn) {
        const card = muteBtn.closest('.reel-card');
        const id = parseInt(card.dataset.id);
        const reel = reelsData.find(r => r.id === id);

        reel.isMuted = !reel.isMuted;
        muteBtn.textContent = reel.isMuted ? '🔇' : '🔊';
        console.log(`Video ${id} is now ${reel.isMuted ? 'Muted' : 'Unmuted'}`);
    }
});
This code block demonstrates several advanced concepts: JavaScript DOM traversal using closest(), managing state within an array, optimistic UI updates (updating the interface before the server responds), and error handling in asynchronous operations.
Best Practices and Optimization
As you advance in your Web Development career, writing code that works is only half the battle. Writing code that is performant, secure, and maintainable is what distinguishes a senior developer. When working with events, there are several JavaScript Best Practices to keep in mind.
1. Performance: Debouncing and Throttling
Events like scroll, resize, or mousemove can fire hundreds of times per second. Running complex logic or DOM updates on every trigger will crash your browser. To solve this, we use JavaScript Optimization techniques like Debouncing.
// Utility: Debounce Function
// Ensures a function is not called again until a certain amount of time has passed
const debounce = (func, delay) => {
    let timeoutId;
    return (...args) => {
        clearTimeout(timeoutId);
        timeoutId = setTimeout(() => {
            func.apply(this, args);
        }, delay);
    };
};

// Example Usage: Logging scroll position
const handleScroll = () => {
    console.log('User has stopped scrolling, fetch more content now.');
    // Logic to fetch next page of reels...
};

// Only runs 200ms after the user STOPS scrolling
window.addEventListener('scroll', debounce(handleScroll, 200));
2. Security: XSS Prevention
When using innerHTML to render content dynamically, you open yourself up to Cross-Site Scripting (XSS) attacks if the data comes from user input (like comments or captions). Always sanitize data before injecting it into the DOM. Alternatively, use textContent for text-only updates or use modern frameworks that handle sanitization automatically.
3. Cleanup
In Single Page Applications (SPAs) built with React, Angular, or Svelte, components are mounted and unmounted frequently. If you add an event listener to the global window object but fail to remove it when the component is destroyed, you create a memory leak. Always use removeEventListener when a component unmounts.
Conclusion
Mastering JavaScript Events is a journey that transforms you from a layout builder to an application architect. We have explored how to attach basic listeners, how to structure JavaScript Objects to drive the UI, and how to use Event Delegation to handle complex, dynamic interfaces efficiently. By combining these DOM skills with JavaScript Async capabilities, you can build responsive, “alive” applications similar to the social media platforms we use daily.
As you continue your Frontend Journey, try to replicate complex UI patterns—like a drag-and-drop interface, a custom video player, or an infinite scroll feed—using these principles. Experiment with JavaScript ES2024 features, dive into TypeScript Tutorial resources to add type safety to your event handlers, and remember: the best way to learn is by building.